Quantcast
Channel: FORNAV
Viewing all 372 articles
Browse latest View live

Merry Christmas and Happy New Year

$
0
0

We’d like to say a heartfelt thank you to all our customers, partners, vendors, friends, and other stakeholders for a great 2019. We wish you all a Merry Christmas and a happy and prosperous New Year.

And we look forward to continuing to work with you in 2020.

Your ForNAV team

The post Merry Christmas and Happy New Year appeared first on ForNAV.


New subscription procedure

$
0
0

As you know, subscription customers (OnPrem or private cloud) require a new ForNAV license file to be installed yearly. Twenty-one days prior to renewal, customers get a warning that their license is about to expire. This was meant to be a service, but it turns out that many customers get worried about this – for no reason. So, starting from January 1, 2020, we will invoice subscription customers one month earlier than we currently do. This will allow enough time for you to invoice your customer, to settle the invoice with ForNAV, to receive the new license file, and get it installed at the customer site, preventing the warning from showing up.

The post New subscription procedure appeared first on ForNAV.

New price for the check report with MICR font

$
0
0

We have listened to you. Many North American partners have asked us for an option to buy ForNAV with the check report with MICR font only.

We are therefore happy to announce that, from today, you can buy ForNAV with the check report only for Microsoft Dynamics 365 Business Central Cloud at just 390 USD (487.50 CAD) on a yearly subscription. We only provide a yearly payment option to save administration for all of us.

This price, of course, includes the ForNAV Designer, so you can still modify the check report as needed. And you will also have your normal partner margin on this price.

Want to learn more? Take a look at our recent webinar about check reports: https://youtu.be/6LIVlYUDA3g – or simply drop a mail to us: info@fornav.com

The post New price for the check report with MICR font appeared first on ForNAV.

Trusted Certificates

$
0
0

Trusting Your Service Tier Certificate

If you want to connect your ForNAV Designer to a service tier using secure communication via HTTPS/SSL then you need to be able to trust the certificate installed on the service tier.

Normally, your service tier certificate used in a production environment is a valid certificate that was issued by a certificate authority. Therefore, the trusted relationship is already in place.

In a development environment or a Docker container, you often use self-signed certificates that cannot be validated by already trusted certificate authorities. In this case, you must tell your Windows installation to trust the self-signed certificate in order to use it for secure communication.

On Docker, you can often download the self-signed certificate from an URL similar to this:

http://bc150:8080/certificate.cer

When you have a local copy of the certificate file, you can double-click it to see the following Certificate dialog box:

From this dialog box, to open the Certificate Import Wizard, click Install Certificate.

It is up to you if you want to install the certificate for you only or for all users on your machine. In a typical development scenario, it is sufficient to install the certificate for the current user.

When you are asked where you want to install the certificate, you must select Trusted Root Certificate Authorities:

When the certificate is properly installed on your machine, you can start designing reports over a secure connection to your service tier.

The post Trusted Certificates appeared first on ForNAV.

CurrControl

$
0
0

Setting forecolor, back color, font, and formatting dynamically on a control

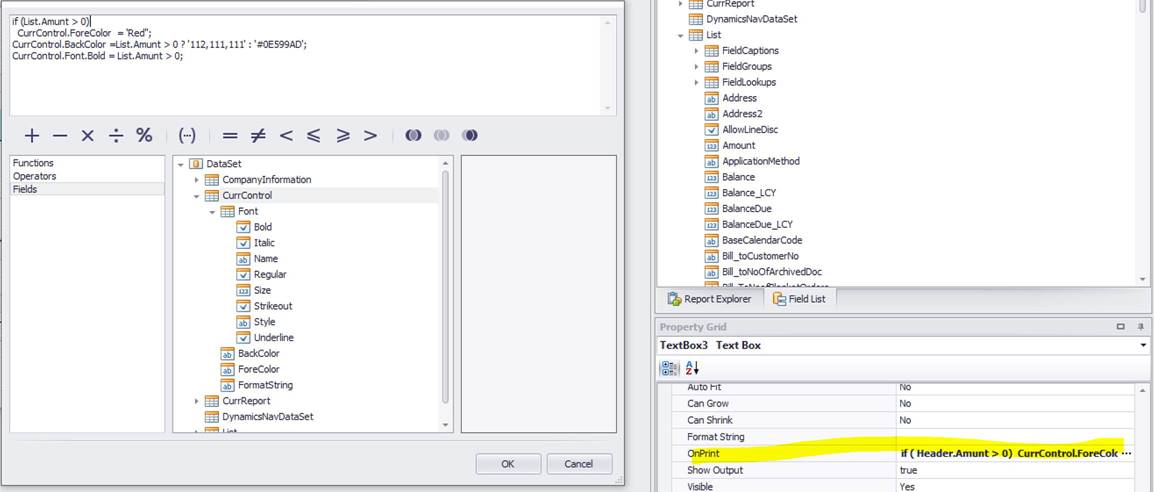
ForNAV supports a wide array of properties to control the look of controls. However, sometimes you might want to control the look dynamically, based on values in the data set.

To do this, you use the OnPrint JavaScript trigger. The OnPrint trigger has a CurrControl class with four properties: Font, BackColor, ForeColor, and FormatString:

  • Font is used to set the size, name, and properties (Bold, Italic,..) of the font.
  • ForeColor and BackColor sets the colors, where the following five formats are supported:
    • Name (‘Red’, ‘Green’,…)
    • Hex (‘#<number>’)
    • Number (‘<number>’)
    • ARGB (‘<Alpha>,<Red>,<Green>,<Blue>’)
    • RGB (‘<Red>,<Green>,<Blue>’)
  • FormatString is used to set the window format string (http://www.cheat-sheets.org/saved-copy/msnet-formatting-strings.pdf=)

The post CurrControl appeared first on ForNAV.

ForNAV Training af Days of Knowledge 2020

Join our upcoming webinars

$
0
0

Webinar – Introduction to ForNAV

Are you new to ForNAV – or simply interested in learning a bit more about what we can offer? Then you should join this webinar! You’ll get an overview of ForNAV, and we’ll take you through the key parts, such as how to configure standard reports and make small changes to the reports. You’ll also learn how easy it is to build brand-new reports, and you will gain an idea about some of the more advanced parts of ForNAV – still with simplicity as the key differentiator.

The webinars takes place on

  • Wednesday, February 26, 2020 at 10.00 CET and
  • Thursday, February 27, 2020 at 16.00 CET / 10AM EST

Speakers: Mark Brummel, Senior Product Specialist, ForNAV and Jan Sillemann, partner, ForNAV.

Please sign-up here.

Webinar – Working with reports in AL made easy

Microsoft Dynamics 365 Business Central and AL provide a lot of new possibilities and opportunities. However, working with AL in Visual Studio Code requires certain developer skills. With the latest version of ForNAV, you now have the option to work both with and without AL/Visual Studio Code. This means that hardcore developers can continue to work with AL and ForNAV, but we have introduced the option to work with reports entirely from the ForNAV Designer tool.
For example you can:

  • Build a brand-new report in less than 5 minutes using a WYSIWYG tool and upload it directly to Business Central
  • Preview any layout changes immediately with live data
  • Use the option to add a new data item to a report layout without changing any AL code and without duplicating the report
  • Use any field or caption from tables and table-extensions in Business Central without having to define columns in the dataset
  • Upload and download reports directly from Business Central using the ForNAV Designer without using PowerShell
  • Use our new translation tool to change captions in reports

The bottom line is that you can work with reports at a much lower cost and take better advantage of your scarce resources.

Join our webinar and learn how easy it is to work with reports in AL. The webinar takes place on:

  • Wednesday, March 25, 2020 at 10.00 CET and
  • Thursday, March 26, 2020 at 16.00 CET / 10AM EST

Speakers: Mark Brummel, Senior Product Specialist, ForNAV and Michael Nielsen, partner, ForNAV.

Please sign-up here.

The post Join our upcoming webinars appeared first on ForNAV.

Adding data items to a layout

$
0
0

This Knowledge Base article is relevant for ForNAV version 5.1.0.1850 and higher.

Currently, the only way to add data items to a report in Microsoft Dynamics 365 Business Central is to make a copy of the report and add new data items using Visual Studio Code or in the ForNAV Designer if it is a ForNAV report.

As a result, the code in the report must be maintained separately and other objects pointing to the report must be rerouted to call the new report instead.

Because of this, ForNAV now supports adding data items to an existing layout without touching the AL code in the object/extension.

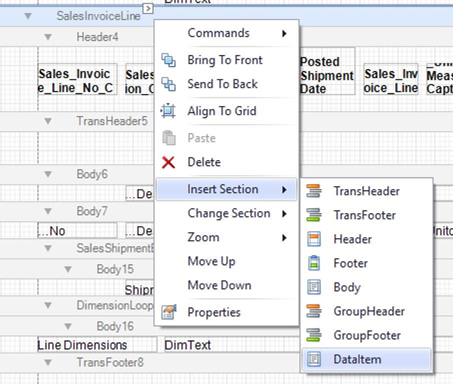
To add a data item, for example, Assembly, under the Sales Line, simply right-click an existing data item or the root report in the Report Explorer and click Insert Section and then DataItem.


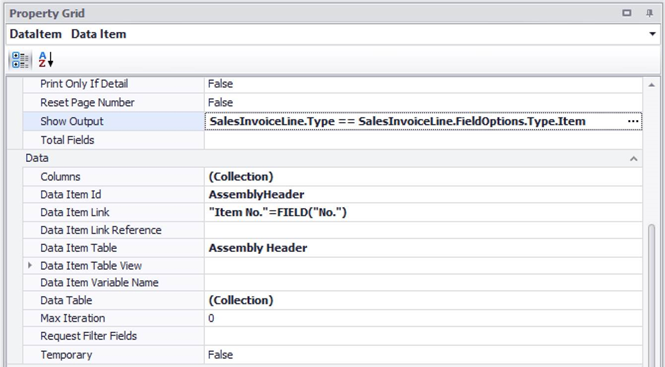
The next step is to specify the Data Item Table and Data Item Link values and to specify the Show Output so that only lines with the correct type are used.

To insert the Assembly
line data item, simply add a new data item to the Assembly Header data item and specify the Data Item Table and Data Item Link fields in the same way as the AssemblyHeader data item.

To complete the report, simply add the required sections and control.

You can preview the report at any time and, after you save, the report will have the new data items and layout.

To deploy the layout from a development setup such as a Sandbox, simply export the layout from the custom layout page and import the layout in the production environment.

The only limitation is that the added data items cannot have request page fields or use temporary tables, because they are hidden from the Business Central/Dynamics NAV report engine. Everything else, including totals and group-totals, works like normal.

If you later save the report as an .al file in the ForNAV Designer using the Save As function, the new data items are inserted in the resulting .al file.

The post Adding data items to a layout appeared first on ForNAV.


Translation

$
0
0

This Knowledge Base article is relevant for ForNAV version 5.1.0.1850 and higher.

Sometimes, you might want to change the captions shown in reports to fulfill special customer demands or adhere to industry specific terms (for example, client instead of customer).

In C/SIDE, you could do this easily by changing CaptionML strings as needed. However, in AL it is a different story because captions are stored in XLF files, which have to be recompiled together with the extension they belong to in order for the caption to change. This is time-consuming, and changing the base application or ISV code is not possible in Business Central Cloud and not recommended in Business Central OnPrem.

To solve this issue, ForNAV has introduced a translation layer between the ForNAV report engine and the Caption system in Business Central. This means that you can easily change all the captions in a report using a simple ForNAV Translations page.

This page has two modes: Objects mode and Translations mode. To switch between the two modes, simply click either the Objects or Translations action.


Objects mode

In Objects mode, you can specify translations for a:

  1. Report caption – Table No. and Field No. are zero.
  2. Table caption – Table No. is the number of the table and Field No. is zero.
  3. Field caption – Table No. is the number of the table and Field No. is the number of the field.


If the Report ID is zero, the translation covers all reports and if it is not zero, the translation only covers the specific report.


Translations mode

In Translations mode, you can define a number of translations for strings in a given language.  You must use these translations carefully because they do not have a filter (as in Objects mode). The translations work as a fallback for the Objects mode, if a translation does not exist there.


Soft hyphens

Some languages have very long words and because Windows has no built-in algorithm to determine how to break up words, in most cases they are broken up in the wrong place and the output looks unprofessional.

To get around this, ForNAV supports the Softhyphen Unicode character that gives Windows hints about where to break up words and inserts hyphens when needed. By default, ForNAV inserts soft hyphens for the most common word in a given language – but sometimes you might need to specify in the ForNAV translation system.

For example, in the following German caption “Nicht fakt. Wareneingänge“, the ‘~’ character is used as a placeholder for the Softhyphen Unicode character:


Import / Export

To be able to maintain the translations in Excel or deploy translations to a production environment, you can use the Export and Import functionality.

The post Translation appeared first on ForNAV.

FieldOptions

$
0
0

This Knowledge Base article is relevant for ForNAV version 5.1.0.1850 and higher.

When using JavaScript in the ForNAV Designer, it is sometimes necessary to write conditions based on the value of option fields in Business Central/Dynamics NAV.

Because of this, in the Field List in the ForNAV Designer, we have introduced a new set of FieldOptions values, with the syntax <Record>.FieldOptions.<OptionField>.<Option>:


These values are strings containing the translated values of the option, which means that one of them will have the same value as the Option field they represent. The Blank option is a special case; this only exists if there is an option with a value consisting of exactly one space character. In this case, the Body1 section will only be printed if the Line Type is Item.

The post FieldOptions appeared first on ForNAV.

Announcing ForNAV 5.1

$
0
0

We are happy to announce general availability of ForNAV 5.1 (5.1.0.1851).

The new version of ForNAV includes:

  • The possibility of no AL code

    ForNAV 5.1 has full support for editing and building reports from within the ForNAV Designer. Without using Visual Studio Code. Both in Production and Sandbox environments. Of course, if you need to, you can still use Visual Studio Code as much as you want.


  • Improved setup dialog

    The setup dialog introduced in ForNAV 5.0 has been further enhanced. Finding you way through the different versions and support for connection types is now extremely easy. You simply select the version of Dynamics NAV or Business Central you are working with, and then only the connection scenarios that are relevant for you are displayed.


You can see the full list of changes to ForNAV here: www.fornav.com/version-history

You can download ForNAV 5.1 here: www.fornav.com/download

Please share this information with any of your colleagues who might find it relevant.

Any questions or feedback? Simply write an email to support@fornav.com

The post Announcing ForNAV 5.1 appeared first on ForNAV.

FIK code

$
0
0

In some cases, customers still want to have a FIK code on their invoices. To make this possible, ForNAV has a built-in function string, PaymentId(int IKCardType,string Number),which you can use to create the FIK string.

If you use Continia’s Payment solution, to create the following FIK string:

+71<000000004040663+12345678<

Code

Description

+71

Payment type

404066

Invoice number

3

Control code for modulus 8 check

12345678

Credit account


  1. Define a Payment Setup record under report properties.
  2.  

  3. Specify that the Payment setup can be read from the database in the OnPre Report property.
  4.  

  5. Use the following source expression:  ‘+’ + PmtSetup.IKCardType + ‘<‘ + CurrReport.PaymentId(PmtSetup.IKCardType,Header.No) + ‘+12345678<‘ and set the font to OCRB.


Alternatively, if you want to use a field from a custom table:

  1. Define a MyPmtSetup record in the same way as described previously.
  2. Insert a Get call in the OnPre Report property in the same way as before.
  3. Use the following source expression, ‘+’ + MyPmtSetup. CardType + ‘<‘ + CurrReport.PaymentId(MyPmtSetup. CardType,Header.No) + ‘+12345678<‘, where CardType must contain a valid card type integer (the field type can be integer, code or text) and the font must be set to OCRB.


Alternatively, if you want to use a hardcode card type:

  • Use the following source expression, ‘+’ + 71 + ‘<‘ + CurrReport.PaymentId71,Header.No) + ‘+12345678<‘, where the integer constant must contain a valid card type and the font must be set to OCRB.


You get the following result:

The post FIK code appeared first on ForNAV.

ForNAV Coffee Break

Announcing ForNAV 5.2

$
0
0

We are happy to announce general availability of ForNAV 5.2 (5.2.0.1917).

The new version of ForNAV includes:

  • Support for Dynamics 365 Business Central 2020 release wave 1 (Business Central 16)
  • Modifiable captions using the ForNAV Language feature when the ForNAV Report pack 5.2 is installed
  • Add-a-field – add fields to existing tables and use them on ForNAV reports and pages
  • Linking JavaScript records to data items to get the value of any related field in the database
  • Auto fetch of Company Information Setup and ForNAV Setup JavaScript records
  • Automatically inherited JavaScript records from Master reports

    f

You can see the full list of changes to ForNAV here: www.fornav.com/version-history

You can download ForNAV 5.2 here: www.fornav.com/download

Please share this information with any of your colleagues who might find it relevant.

Any questions or feedback? Simply write an email to support@fornav.com

The post Announcing ForNAV 5.2 appeared first on ForNAV.

Add a new field without Visual Studio Code in less than 30 seconds

$
0
0

To add new fields to existing tables and pages faster, ForNAV 5.2 now supports the creation of Table extensions and Page extensions without having to write code in Visual Studio Code. A huge part of this is being able to figure out which Table extensions, Page Extensions, and Field numbers are available – and ForNAV takes care of this.


To add a new field:

  1. In the ForNAV Designer report properties, click the assist edit button on Extend Tables.


  2. Add a new table extension. The default is the table from the first data item in the report – but you can change this. The Number and the Name of the extension is auto-populated and can also be changed.


  3. Add fields. The field numbers and names are auto-populated but you can change them.


  4. Add the pages where you want to add the fields, and select the controls that you want the fields to be added after. The default is the last control of the page.


  5. You can see that the new fields are added automatically to the field list.


  6. You can drag and drop the new fields on the report layout.


  7. When you save the report to the server, the new fields are added to the selected pages and can be filled in.


  8. Click Preview. The report with the new field is printed.


The post Add a new field without Visual Studio Code in less than 30 seconds appeared first on ForNAV.


Hyperlinks in reports

$
0
0

From version 5.2.0.1921 and later, there is support for hyperlinks in reports.

This means that for text boxes and table cells, you can set a hyperlink property that will enable the recipient of the report to click the link and open the URL associated with the hyperlink.

You set the hyperlink property from JavaScript in the OnPrint event for the control:

You can browse your way to the hyperlink property in the code editor:

Please note that building a valid hyperlink is a topic in its own right. To build the path and add parameters can sometimes mean that you must encode the values. This is where you will find it useful to use the JavaScript function encodeURIComponent. More information is available here:

https://www.w3schools.com/tags/ref_urlencode.ASP

The post Hyperlinks in reports appeared first on ForNAV.

Define local printers for direct print

$
0
0

With ForNAV 5.3 and ForNAV Report Pack 5.3 (and later versions), you can now define local printers and print ForNAV reports to them directly, without using the usual PDF Print dialog. It is also possible to specify printer attributes, such as Paperkind (A4, Letter, …), Landscape, Duplex, Copies, Color, and Paper Source (paper bins).


Note:

For this to work, you must:

  1. Install ForNAV 5.3 (or a later version).
  2. Install the ForNAV Report Pack 5.3 (either from the Gallery if you are running Business Central OnPrem or from Microsoft AppSource if you are running Business Central Cloud).
  3. Upgrade your existing reports – at least those that you want to print directly – to ForNAV 5.3 if you are running Business Central OnPrem.


The Default printer is always defined as the default printer on the machine where the browser window with Business Central runs.


The columns in the ForNAV Local Printers page specify the following:

  • Cloud Printer Name – The name to specify in the Printer Selections page.
  • Local Printer Name – The name of the printer on the local machine (DEFAULT means the default printer on the local machine).
  • Description – The description of the printer, which is also shown in the Printer Management page:


  • Paperkind – Default, Custom, A4, Letter, … (Default means the default for the region, Custom means that the size is specified by the Unit, Width and Height columns).
  • Unit – Unit of measure for the custom paper size.
  • Width and Height – The paper size.
  • Color – Specifies if the printout should be in color or grey scale.
  • Landscape – Specifies the paper orientation: default for the report, or portrait or landscape.
  • Duplex – Default, simplex, vertical, or horizontal.
  • Copies – The number of copies.
  • Paper Source Kind – The paper tray (Printer Specific, Default, Upper, Middle, Lower, …).
  • Printer Specific Paper Source Name – Name of the of the printer specific paper source.
  • Scale Mode and Scale – Specifies if the document is printed in the actual size, fitted, or zoomed to a scale percentage.


    Note:

    Most printer drivers will not work with the predefined paper sources (Upper, Lower, and so on). You must define a Printer Specific
    Paper Source Kind and a Printer Specific Paper Source Name. If the predefined paper source does not exist, the printer prints out a list of the valid paper sources and printer specific paper source names after the last page of the report. You can use this to identify the correct combination of Paper Source Kind and Printer Specific Paper Source Name.


When you have specified a printer on the ForNAV Local Printers page, you can use it on the Printer Selections page to specify which printer to print to for a ForNAV report:


The next step is to download and install the ForNAV Direct Print Client: www.fornav.com/directprint.


After you have downloaded the ForNAV local printer, you are ready to print and can run one of your ForNAV reports to test it.


When you run the report and click Print on the request page, the download notification appears in your browser – in this example the new Microsoft Edge browser:


To print the report to your local printer (and next time you print, not get the download notification), click Always open files of this type.


Direct print to a local printer also works in AL-code and Report.Print will print directly to a local printer without opening the request page.

The post Define local printers for direct print appeared first on ForNAV.

Installing the ForNAV Direct Print Client

Printer errors

$
0
0

Sometimes you might run into an error message that looks like this:

A call to ForNav.Report.Pre failed with this message: Error in OnPreReport step ‘1423, Check printer selection’

Inner exception 1: You cannot print to \\servername\printername. Please check that you have permission to use it and if the printer is valid.

Even though the printer is online and valid, it might not be set up correctly in the user context where it is needed. If you are using the NAS, then the printer is used from a service context. You must connect the printer to the user context of the NAS service.

To do this:

  1. Look in the list of services on the machine and find the NAS service.
  2. In the Log On As column, find the name of the service user.
  3. Log on to the desktop as this user on the service machine.
  4. In the Run dialog box, enter the full UNC path of the printer.
  5. Connect to the printer and print a test page to make sure it is working.
  6. Now you can sign out and print using ForNAV. The printer is connected and initialized in the context of the service user.

The post Printer errors appeared first on ForNAV.

Debugging reports in Microsoft Cloud

$
0
0

When Business Central reports are generated in Microsoft Cloud, the rendering is done via a ForNAV service endpoint. The endpoint receives the report layout and the data needed to produce the finished report. Normally, the data for the report is not stored anywhere. When the report is created, the data is gone.

In a debugging scenario, it can be helpful to store the report data and corresponding layout so that the rendering can be reproduced in a controlled environment. Therefore, there is a field in the ForNAV setup page where you can tell the service endpoint to keep the data for debugging purpose. The field is called Endpoint Settings. It holds a text string that is sent to the endpoint when the report is created.

To enable debugging mode, type the value debug in the Endpoint Settings field. When the next report is run, the report information is stored and ForNAV support can help analyze the result.


The post Debugging reports in Microsoft Cloud appeared first on ForNAV.

Viewing all 372 articles
Browse latest View live