Quantcast
Channel: FORNAV
Viewing all 372 articles
Browse latest View live

Layout export and import

$
0
0

In the ForNAV Customizable Report Pack version 5.3, we’ve significantly improved the management of customized layouts.

Custom report layouts

All ForNAV reports have a built-in layout. This is the default layout that ForNAV has designed for you. There are two ways of customizing the built-in layout: by cloning, and by creating a customized layout.

A custom layout is a copy of the report layout that is stored in your Business Central database rather than in the extension package. You can create as many of these as you want and you can enable them per company.

When you edit a ForNAV report, you have the option to save the changes as a custom report layout. When you don’t have access to the source code of the extension package this is the only way of saving report changes.

New layout

When you want to edit the report layout, you can now simply click on the layout description in the ForNAV Reports page. This opens the ForNAV Designer. When you are finished designing the report, simply click Save As Custom Layout on Server to save your changes. ForNAV creates a custom report layout and enables it for the company you are currently working in.

Copy layout

After you have created a new layout, you can copy it. Select a report and click Layout,
Custom Layouts.

To copy a layout, you select it and click Copy. This creates a copy of the selected layout.

Activate layouts

To activate a layout, you select a report, open the Custom Layouts page and select the Activated check box. This activates the layout and makes Business Central use it when running a report.

Activate layouts in different companies

You can enable different layouts in different companies. To enable a layout for a specific company, you must open that company and enable your report layout.

Export layouts

To export your custom layouts, you must click Layout and then click Export Layouts. This opens the ForNAV Report Layouts page where you can export your layouts.

You can also export your layouts from the Report Layouts of a specific report. In this case, ForNAV only export the layouts from that particular report.

Import layouts

If you want to import the layouts, you must click Layout, Import and select the layouts you want to import from the Layout Import Worksheet.

ForNAV notifies you if the layout you want to import already exists. When you have selected the layouts you want to import, click Import. ForNAV will now import your layouts.

The post Layout export and import appeared first on ForNAV.


Announcing ForNAV 5.3

$
0
0

We are happy to announce general availability of ForNAV 5.3 (5.3.0.1928).


The new version of ForNAV includes:

  • Support for local printers for direct print
    • Support for direct print to local printers from the request page or AL without additional dialogs
    • Easy setup and support for paper sizes, paper bins/trays, duplex, landscape, and color for multiple printers
    • Works with the Microsoft report printer selection subsystem to enable setup of local printers for a single user or for all users
    • Co-exists with Microsoft email-print
    • Direct print actions can be added to any page without writing code
    • Read more here: https://www.fornav.com/knowledge-base/define-local-printers-for-direct-print/ and here: https://www.fornav.com/directprint/


  • Design and handling of Custom report layouts
    • Quick overview of your ForNAV reports in the ForNAV report page
    • Design, print, or run a custom or built-in layout directly from the ForNAV Report page
    • Maintain a history of custom layouts
    • Overview of the active layout for reports in the ForNAV report page
    • Bulk export/import of custom layouts to deploy layouts from development to production environment or to perform backups for source control
    • One-click Report layout selection without having to use the built-in Report Layout Selection Page
    • Read more here: https://www.fornav.com/knowledge-base/layout-export-and-import/


  • Updated ForNAV Standard Report pack
    • Minor improvements to the report pack on Microsoft AppSource for Microsoft Dynamics 365 Business Central Cloud and on the ForNAV Gallery for Business Central OnPrem


You can see the full list of changes to ForNAV here: www.fornav.com/version-history

You can download ForNAV 5.3 here: www.fornav.com/download or on Microsoft AppSource.

Please share this information with any of your colleagues who might find it relevant.

Any questions or feedback? Simply write an email to support@fornav.com

The post Announcing ForNAV 5.3 appeared first on ForNAV.

Archiving in ForNAV

$
0
0

This Knowledge Base article is relevant for ForNAV Report Pack 5.4 and higher.


In the ForNAV Report Pack 5.4 for Microsoft Dynamics 365 Business Central Cloud and Business Central OnPrem version 16 (and higher), ForNAV now supports archiving when a report is previewed, downloaded in Word/HTML/PDF, or printed.


To use this feature, you must be logged in as a super user – other users do not have access to archive pages. Super users can view the archive information and perform some actions on it – but they cannot delete or modify the history.


To get started, in the ForNAV Archive Setup page, enter the reports that you want to archive. (A zero in the Id field means that all ForNAV reports are archived.)


When a report has been run, the output is displayed on the ForNAV Document Archive page.


For each document, primary keys are listed, separated by semi-colon. These primary keys are searchable, to make it easy to locate a single document.


On this page, you can also:

  • View the document by downloading it and opening it in the relevant program (Word, Excel, and so on).
  • Download one or more documents to a zip-file for backup. (You can select a year or a month by selecting the year and/or month rows on the page).
  • Purge the contents of one or more documents so it will not take up space. (A warning appears if there is no backup of the document.)
  • Show the history of the actions that have been done on the document:

On the ForNAV Reports page, you can find a shortcut to the information, where you can click the number in the Archived column to see the history of the report. (If you click a for a report that does not have archiving enabled, you are asked if you want to enable archiving).

The post Archiving in ForNAV appeared first on ForNAV.

AL Project Settings Requirements

$
0
0

When you add ForNAV reports to your AL project, there are a couple of things you must set up. If you are starting a new project, the Designer can create a new project folder for you.

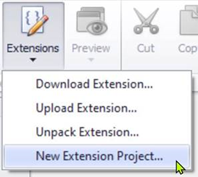
Click Extensions on the toolbar and select New Extension Project.

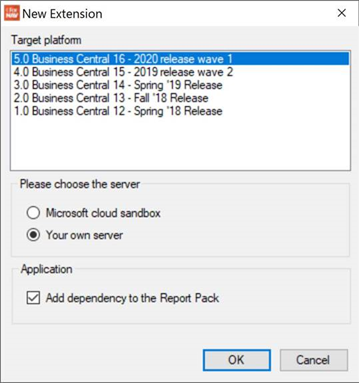
The Designer asks you which version of Business Central you are using and if it is running on-premise or in the cloud. If you are using the ForNAV report pack then you can choose to add a dependency in the new project.

When you accept the settings, the new project files are created in the folder you have chosen.

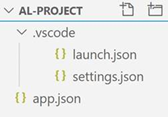
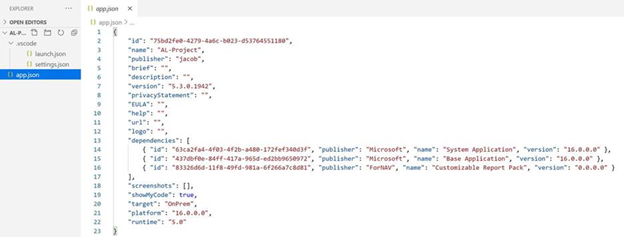
The following shows the project structure for an on-premise solution. It has created a launch.json, settings.json, and app.json.

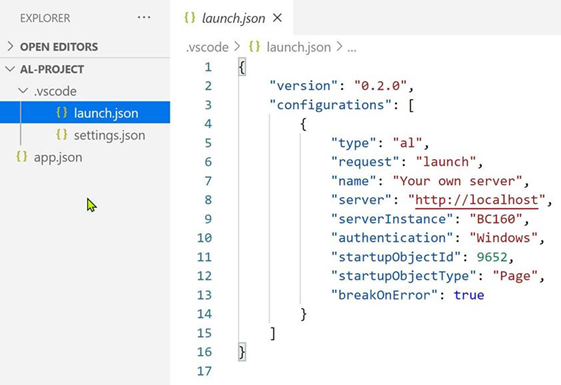
The launch.json does not have any specific ForNAV settings. It has a start page pointing to the standard page for setting report layouts.

The settings.json specifies a probing path. This is where the compiler looks for the ForNAV add-in DLL. Every time you install a new version of the ForNAV Designer, it places a copy of the add-in DLL in this folder. This is why we choose to point to this folder instead of the add-in folder under the service tier. It is not a problem that the VS Code environment and the service tier finds the correct add-in version in different folders. This reference is only for the compilation of the app under VS Code.

Because we chose to create a dependency to the ForNAV Report Pack, the app.json has this dependency. Other than that, the app.json looks normal.

If you already have an AL project folder with an existing extension and you want to add ForNAV reports to that, then you must make the above changes to your configuration files.

The post AL Project Settings Requirements appeared first on ForNAV.

A transaction must be started

$
0
0

If you are running a ForNAV report based on version 5.3 or earlier in Business Central 16 or newer, you might run into the following error when you save your report as an Excel document:

A transaction must be started before changes can be made to the database.

Microsoft Excel export problems are typically caused by problems in the exported data or a version mismatch between the loaded and required version of a Microsoft.NET assembly named DocumentFormat.OpenXml.

If it is a data problem, then you can often solve it by following the Excel Troubleshooting guide to collect debug data.

If it is the assembly problem, you can see something similar to the following in your event log on the service tier machine:

The message in the event log is:

The located assembly’s manifest definition does not match the assembly reference. (Exception from HRESULT: 0x80131040)

Solution

Search the Internet for Open XML SDK 2.5 for Microsoft Office. This takes you to the Microsoft website where you can download OpenXMLSDKV25.msi.

https://www.microsoft.com/en-us/download/details.aspx?id=30425

After installing this MSI package, the required assembly in the required version 2.5 is in the Assembly GAC on the computer.

You must RESTART your service tier after installing the package. Otherwise, it will not see the installed file.

The post A transaction must be started appeared first on ForNAV.

Hide the Design option on the request page

$
0
0

This article applies to on-premise Microsoft Dynamics NAV/Microsoft Dynamics 365 Business Central installations running the role tailored client.

The Design option is shown on the request page of ForNAV reports, if the ForNAV Designer is installed on the client machine and you are a SUPER user in Business Central.

This makes it relatively easy to control on a normal laptop or workstation, where the user is the same all the time. However, in a server environment, such as Terminal Server or Citrix, it can be difficult because some users might need the Designer whereas others should not see that option.

In the server scenario, you can use a registry setting to control which users will see the Design option.

In the Users value field, enter a list of usernames separated by a comma. Only these users can see the Design option.

Note: The listed usernames are case insensitive.

The post Hide the Design option on the request page appeared first on ForNAV.

New JavaScript properties and functions in ForNAV 5.4

$
0
0

With version 5.4, you can now do everything in JavaScript that you can do in AL, and much more.

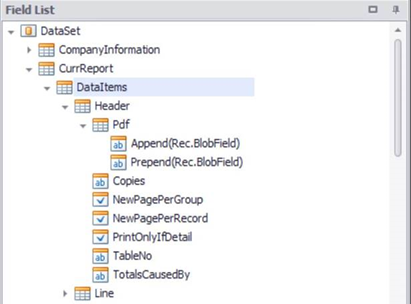
And the Field List in the Designer now makes it easier to use properties and functions on the report and dataitem object.


For example:

  • CurrReport.<dataitemid>.Pdf.Append(<Rec.BlobField>) –  appends a PDF from a blob field to the dataitem.
  • CurrReport.Watermark.Image.Image = <Rec.BlobFIeld> – sets the watermark for the next page.


In the JavaScript expression editor there are also additional JavaScript functions you can use:


  • CurrReport.DotNetFormat(<value>,'<dotnetformatstring>’) and CurrReport.DotNetFormat(<value>,'<dotnetformatstring>’,<languageid>) – format a value using a .net formatstring using the current language or a specific language.
  • CurrReport.Translate(‘<caption>’) – looks up the translation of a caption in the ForNAV Language table based on the current language.

The post New JavaScript properties and functions in ForNAV 5.4 appeared first on ForNAV.

Announcing ForNAV 5.4

$
0
0

We are happy to announce general availability of ForNAV 5.4 (5.4.0.1997).


The new version of ForNAV includes:

  • Support for Microsoft Dynamics 365 Business Central 17 (2020 Release Wave 2)
  • Enhanced no-code/low code experience for creating and customizing reports without having to use Visual Studio Code
  • Creation of new ForNAV reports from the Business Central web client
  • Even faster execution of reports on Business Central Cloud
  • Implicit WITH fix and explicit WITH removal when converting from txt to AL or AL to AL
  • New JavaScript functions for no AL-code development:


  • Updated ForNAV Standard Report pack:
    • Support for Business Central 17
    • Archiving and audit trail of printed documents (read more here: Archiving in ForNAV)
    • File Storage library to allow dynamic use of bitmaps, PDFs and long text strings in control source expressions and JavaScript expressions
    • Improved local print error handling when the printer does not exist
    • Support for service endpoint settings to help debugging
    • Minor improvements to the report pack on Microsoft AppSource for Microsoft Dynamics 365 Business Central Cloud and on the ForNAV Gallery for Business Central OnPrem


You can see the full list of changes to ForNAV here: www.fornav.com/version-history

And you can see the full list of changes to ForNAV Standard Report pack here: www.fornav.com/version-history-report-pack

You can download ForNAV 5.4 at www.fornav.com/download or on Microsoft AppSource.

To learn more about the new features in ForNAV 5.4 and more, please take a look at our Coffee Breaks: www.fornav.com/coffeebreak

Please share this information with any of your colleagues who might find it relevant.

Any questions or feedback? Simply write an email to support@fornav.com

The post Announcing ForNAV 5.4 appeared first on ForNAV.


Update ForNAV Cloud

$
0
0

Updating ForNAV in cloud situations is a four-step process:

  1. Download the latest version of ForNAV from https://www.fornav.com/download/
  2. Install ForNAV on the Designer computers.
  3. Upgrade the ForNAV Customizable Report Pack extension (optional).
  4. If necessary, upgrade the Custom Layouts and Custom reports.

1. Download

You can download the latest version of ForNAV from https://www.fornav.com/download/. This download contains all the installation options for Designer and server computers.

2. Install ForNAV on Designer computers

When you install a new version of ForNAV, you must never uninstall any previous versions because you might need the old version dll later.

In the Setup wizard, select the Development installation option:

After you have installed the ForNAV Designer, you must connect it to Business Central and test the connection.

3. Upgrade the report pack extension

This step is optional; the report pack is upgraded automatically during your scheduled Business Central upgrades. However, in some cases, it might be necessary to upgrade the Report Pack manually.

To upgrade the report pack, you must uninstall the current version of the ForNAV Core extension. This automatically uninstalls any extension that is dependent on the ForNAV Core, including the Customizable Report Pack.

To uninstall the ForNAV Core extension, you open the Extension Management page, find the ForNAV Core extension, and select Uninstall.

Note: Do not select Delete Extension Data.

After you select Uninstall, Business Central warns you that several other extensions will also be unpublished, most notably the ForNAV Customizable Report Pack. You must make a list of these extensions. If they are per tenant extensions, you need their installation files to reinstall them later.

Next, you can install the new version from Microsoft AppSource. After installing the ForNAV Customizable Report Pack from AppSource, you can install all the dependant extensions.

4. Upgrade the custom ForNAV reports

After ForNAV has been fully upgraded, you can upgrade your custom ForNAV reports, for example if you want to take advantage of new features in our report pack. You can do this by simply opening the reports or layouts in the new version of the ForNAV Designer and saving them again.

The post Update ForNAV Cloud appeared first on ForNAV.

Update ForNAV from on premise to cloud

$
0
0

Moving your ForNAV reports from on premise (C/Side or extensions) to cloud is a matter of conversion. On premise ForNAV reports use a dll to render; cloud ForNAV reports use a web service, therefore you must convert your reports. This conversion is a three-step process:

  1. Upgrade to the latest version of the ForNAV Designer and Converter.
  2. Configure the extension app for ForNAV cloud.
  3. Convert reports with the ForNAV Converter.

1. Upgrade to the latest version of ForNAV

The first step is to upgrade the ForNAV Designer and Converter. You can download the latest version of ForNAV from https://www.fornav.com/download/.

When you install a new version of ForNAV, you must never uninstall any previous versions because you might need the old version dll later.

In the Setup wizard, select the Development installation option:


2. Configure the extension app for ForNAV cloud

You must set up an extension for ForNAV cloud. You can either edit an existing On Premise extension or create a new one. For a ForNAV cloud extension, you must make sure your extension target is cloud and the ForNAV Core extension has been added to the dependencies. The dependency to the ForNAV Customizable Report Pack is optional. Before converting reports, you must make sure your extension has been compiled and an app file has been created.

Sample from an app.json file:


3. Convert reports with the ForNAV Converter

The final step is to convert the existing reports with the ForNAV Converter.

To use the ForNAV Converter for conversion to a cloud extension, you must configure the following settings:

  • The connection string. This must point to the base folder of your compiled extension.

  • Input file. The input file must be in your extension folder or one of its subfolders. The input files can be either txt exports of your C/Side ForNAV reports or On Premise report AL files. You can use a wildcard to specify your files, such as *.txt or *.al.
  • Output file. This must point to your extension base directory, or one of its subfolders. You can use a wildcard to specify your file names, such as *.al.
  • Target ForNAV Version. This is unused for conversion to cloud.
  • NAV Compatibility. You must set this to Business Central Cloud.
  • The Advanced tab. On the Advanced tab, you can specify further conversion parameters. These are explained in different KB Articles.

After you have finished configuring these settings, to convert your ForNAV reports, click Convert.

The post Update ForNAV from on premise to cloud appeared first on ForNAV.

Update ForNAV on premise (BC14 and later)

$
0
0

Updating ForNAV in on-premise situations is a five-step process:

  1. Download the latest version of ForNAV from https://www.fornav.com/download/
  2. Install ForNAV on the Designer computers.
  3. Install ForNAV on all service tiers.
  4. Upgrade the report pack extension (optional).
  5. Upgrade the custom ForNAV reports.

1. Download

You can download the latest version of ForNAV from https://www.fornav.com/download/. This download contains all the installation options for Designer and server computers.

2. Install ForNAV on Designer computers

The second step to upgrade ForNAV is on the Designer computers. When you install a new version of ForNAV, you must never uninstall any previous versions because you might need the old version dll later.

In the Setup wizard, select the Development installation option:

After you have installed the ForNAV Designer, you must connect it to Business Central and test the connection. This checks and updates the ForNAV Core extension.

3. Install ForNAV on all service tiers

The next step is to install the new version of the ForNAV dll on all the service tier computers. Again, you must never uninstall any previous versions because you might need the old version dll later.

When the installation is complete, you must ensure the ForNAV dll has been installed in all Business Central server instances; the installer will only find the service tiers that are installed in the default location. You must ensure that every server instance has a copy of the ForNAV dll in its Add Ins folder.

Note that you must name the folders for the DLL in the following specific pattern:

ReportsForNAV_x_x_x_x


4. Upgrade the report pack extension

This step is optional. If you have not installed the ForNAV Customizable Report Pack, you can move straight to step 5.

To upgrade the report pack, you must first uninstall the current version of the report pack. This automatically uninstalls any extension that is dependent on the report pack. After this, you can download the new version in the Online Report Gallery in the ForNAV Designer. Click New and then click ForNAV Report Pack (Extension App).

After you have downloaded the Report Pack app file, to upload it in your Business Central instance, in the Report Designer, click Extensions, Upload Extension.

5. Upgrade the custom ForNAV reports

After you have fully upgraded ForNAV, you can upgrade your custom ForNAV reports. You can do this by simply opening a report in the new version of the ForNAV Designer. ForNAV then asks you if you want to upgrade your report.

Alternatively, you can upgrade all your reports at once using the ForNAV Converter. To upgrade your reports from C/SIDE, you must export your reports to a text file first. If your reports are in an extension already, you can use the extension folder as the source folder for the ForNAV Converter.

If you convert to an extension, you must set the Connection string for symbol information field to the extension base folder and your extension must be compiled to use it as symbol information in the Converter.

The post Update ForNAV on premise (BC14 and later) appeared first on ForNAV.

Calculating week numbers

$
0
0

JavaScript does not have a built-in function to calculate the ISO week number from a day. Therefore, to get the week number, in the ForNAV Designer, you must paste the following code into the OnPreReport trigger:


Date.prototype.getWeek = function() {

  var date = new Date(this.getTime());

  date.setHours(0, 0, 0, 0);

  // Thursday in current week decides the year.

  date.setDate(date.getDate() + 3 – (date.getDay() + 6) % 7);

  // January 4 is always in week 1.

  var week1 = new Date(date.getFullYear(), 0, 4);

  // Adjust to Thursday in week 1 and count number of weeks from date to week1.

  return 1 + Math.round(((date.getTime() – week1.getTime()) / 86400000

                        – 3 + (week1.getDay() + 6) % 7) / 7);

}


When the function is there, you can use it in JavaScript for code and source expressions.


For example: SalesHeader.LastShipmentDate.getWeek()

The post Calculating week numbers appeared first on ForNAV.

JavaScript Records

$
0
0

We have extended the JavaScript Record functionality so that most database operations can be done without writing JavaScript code.


To change or add a JavaScript Record in a report, in the Property Grid, in the Records row, click the assist edit button (…).


In the Collection Editor, you can now add or change records:

  • To add a new record, click Add and select a table.

    The default name for the record is a valid JavaScript name based on the table name – but you can change it if you want to.

  • You can now add flow fields, which are calculated after a record has been read, and you can set a Where filter on the record.


Reading JavaScript Records from the database

Records referring to the Company Information table or the ForNAV Setup table are automatically read from the database before the OnPreReport trigger is run, because they only contain one record (Singletons). Records from other tables must be read using the Javascript <Record>.First() function or using a Data Item Link Reference.


Adding a Data Item Link Reference means that the record is automatically read from the database before the OnAfterGetRecord trigger for the data item using the filters from the data item link and the Where clause. If there is more than one record, the first record is returned and if no record is found, the record is reset.

The post JavaScript Records appeared first on ForNAV.

FieldExtensions and FieldGroups

$
0
0

This Knowledge Base article is relevant for ForNAV Designer version 5.5 and higher.


Until now, it has required some coding in JavaScript to format pairs of captions/values and to hide the caption if the value is blank.


For example, in the ForNAV report pack, the standard footer looked like the following:

[

CompanyInformation.PhoneNo  != ” ? CompanyInformation.FieldCaptions.PhoneNo + ‘ : ‘ + CompanyInformation.PhoneNo  : null,

CompanyInformation.E_Mail != ” ? CompanyInformation.FieldCaptions.E_Mail + ‘ : ‘ + CompanyInformation.E_Mail : null,

CompanyInformation.HomePage  != ” ? CompanyInformation.FieldCaptions.HomePage + ‘ : ‘ + CompanyInformation.HomePage : null,

CompanyInformation.VATRegistrationNo != ” ? CompanyInformation.FieldCaptions.VATRegistrationNo + ‘ : ‘  + CompanyInformation.VATRegistrationNo : null,

CompanyInformation.IBAN != ” ? CompanyInformation.FieldCaptions.IBAN + ‘ : ‘ + CompanyInformation.IBAN : null,

CompanyInformation.SWIFTCode  != ” ? CompanyInformation.FieldCaptions.SWIFTCode + ‘ : ‘ + CompanyInformation.SWIFTCode : null

].

filter(function (val) {return val;}).join(‘ | ‘)


To make this more readable and editable, we have introduced the concept of FieldExtensions so the expression can now be written like the following:

var joinFormat = ‘ : ‘;

CurrReport.JoinStrings(‘ | ‘,

CompanyInformation.FieldExtensions.PhoneNo.Format(joinFormat),

CompanyInformation.FieldExtensions.E_Mail.Format(joinFormat),

CompanyInformation.FieldExtensions.HomePage.Format(joinFormat),

CompanyInformation.FieldExtensions.VATRegistrationNo.Format(joinFormat),

CompanyInformation.FieldExtensions.IBAN.Format(joinFormat),

CompanyInformation.FieldExtensions.SWIFTCode.Format(joinFormat))


To support this, the Field List in the ForNAV Designer has a new node:


Dragging in nodes from FieldExtensions creates new controls with the source expression Rec.FieldExtensions.Field that output “<caption>: <value> if the value is not blank, and blank if the value is blank. In addition to this, Rec.FieldExtensions.Field also has the following set of functions and properties:

  • Rec.FieldExtensions.Field.Format(<delimiter>) – replaces the “: ” delimiter.
  • Rec.FieldExtensions.Field.Format(<delimiter>,<format>) – replaces the “: ” delimiter and formats the value using a .net format string.
  • Rec.FieldExtensions.Field.Format(<delimiter>,<format>,<languageId>) – replaces the “: ” delimiter and formats the value using a .net format string and a language ID (lcid).
  • Rec.FieldExtensions.Field.HasValue – returns true if the value is not blank.


To help with formatting, you can use a new function: CurrReport.JoinString(<delimiter>, <string>,…). This function automatically compresses the output to remove blank values.


To create parity, Rec.FieldGroups.Field now also has the following Format functions:

  • Rec.FieldGroups.Field.Format(<delimiter>) – replaces the new line delimiter.
  • Rec.FieldGroups.Field.Format(<delimiter>,<languageId>) – replaces the new line delimiter and formats the address according to a language ID.


The ForNAV Report Pack will be updated in the coming version 5.6 to use these new concepts.

The post FieldExtensions and FieldGroups appeared first on ForNAV.

Backup when saving from the ForNAV Designer to a server

$
0
0

When developing on Business Central, you might assume that your data and extensions are safe from being deleted, and it is very easy to forget to take backups, especially on sandboxes where there is no customer critical data.


However, your extensions or customer layouts can easily be deleted by mistake or automatically, for example:

  • When Microsoft upgrades a sandbox to a new CU, your developer extensions, including those created by uploading reports with the ForNAV Designer, will be deleted (Cloud only).
  • When a company is deleted, all the custom layouts belonging to the company, including ForNAV layouts, will be deleted (Cloud and OnPrem).


Your ForNAV layouts and/or reports often represent days of hard work with a lot of customer-specific layout and functionality that is difficult to recreate and often requires customer involvement, so you want to avoid losing them.


ForNAV already has functionality to enable you to easily back up and restore custom layouts and extensions, and with ForNAV version 5.5 it can also be done automatically:


In the ForNAV Designer, in Settings, on the new Backup tab, you can see that your backup files are stored by default in your Documents directory.


You can change the directory to point at any directory and if the directory does not exist, the ForNAV Designer will create it. However, we recommend that you use a directory with automatic cloud backup, such as OneDrive. If you don’t want to make backups, you can simply leave the Location of backup files field blank.


When the backup is turned on, you can later retrieve the custom layouts and extensions saved on a Business Central server from the backup directory. And because the filename includes a timestamp, the backup also doubles as source control.


Note!

The backup is managed locally on the Designer computer and therefore it is user specific. This is particularly important to note if you have several users working on the same project.


In general, we recommend GitHub for source control and storing your code. This backup feature should not be seen as a replacement for that.

The post Backup when saving from the ForNAV Designer to a server appeared first on ForNAV.


Announcing ForNAV 5.5

$
0
0

We are happy to announce general availability of ForNAV 5.5 (5.5.0.2032).

The new version of ForNAV includes:


This version does not include an update to the Report Pack.


We strongly recommend updating to ForNAV 5.5, because we have seen examples of partners losing days of work due to lack of backup in a Cloud Sandbox environment.


You can see the full list of changes to ForNAV here: www.fornav.com/version-history

You can download ForNAV 5.5 at www.fornav.com/download or on Microsoft AppSource.

To learn more about the new features in ForNAV 5.5 and more, please take a look at our Coffee Breaks: www.fornav.com/coffeebreak

Please share this information with any of your colleagues who might find it relevant.

Any questions or feedback? Simply write an email to support@fornav.com

The post Announcing ForNAV 5.5 appeared first on ForNAV.

What are the advantages of using ForNAV over Microsoft Word when it comes to reporting?

$
0
0

In Microsoft Word, doing anything other than simple totaling – such as adding fields, data items or data from related tables – requires considerable development work, for example, you have to have different columns for different formatting because using Word in Business Central does not allow for macros or scripting. Maybe you’ve found it impossible in Word to create transport totals or have been struggling with page numbering. It can be nearly impossible to create group totals or work with Show/hide controls. With Microsoft Word layouts, you very quickly need to be able to use Visual Studio Code.


If you want to do more than just a few simple changes in your report layouts, you are much better off using ForNAV.


You can easily and quickly do almost everything in the ForNAV Designer without writing any code at all (and everything else you can do using Visual Studio Code). For anything other than changing an existing field, ForNAV takes half the time that Word takes. And probably even less. Depending on how much you want to customize, you can save considerable development work hours per year by using the ForNAV Designer. In most cases, the ForNAV Designer pays for itself if you want to change even just one or two reports a year.


ForNAV also enables end-users to modify or create their own reports, and has many valuable features, including:

  • Adding new fields and captions (drag and drop)
  • Barcodes/QR codes
  • Master sections/templates
  • Extended PDF support (incl. append/prepend)
  • New page controls
  • Support for JavaScript
  • Watermarks
  • Custom fonts
  • Direct local print
  • Language and terminology support
  • Archiving


The ForNAV team is available to help and support you at any time. You can contact them on support@fornav.com.


Ready to get all the reporting advantages of ForNAV? Download Reports ForNAV here: www.fornav.com/download.


All product names, logos, and brands are the property of their respective owners.

The post What are the advantages of using ForNAV over Microsoft Word when it comes to reporting? appeared first on ForNAV.

License Validation

$
0
0

This article is relevant for ForNAV installations OnPrem or private cloud. If you are running ForNAV for Microsoft Dynamics 365 Business Central Cloud/SaaS, please write a mail to support@fornav.com.

You might find yourself in a situation where you have a ForNAV license installed but you continue to see the Trial message on your reports. There are a few things you can do to check the validity of your license.

Blue Trial Message

If the trial message is in blue then this is a compatibility issue where you are running an older version of ForNAV on a newer version of Business Central or Windows. The ForNAV add-in checks if it was tested for the specific version of your service tier and operating system. In this case, you must upgrade to a newer version of ForNAV. Read how to upgrade your ForNAV to a newer version here: https://www.fornav.com/knowledge-base/upgrade-fornav-version/

Red Trial Message

If the trial message is in red, you have different ways to check your ForNAV license, depending on whether you are running the web client or the RTC client – and whether you run C/SIDE or AL.

The most generic method is to check the Windows Event Viewer on your Service Tier. To do this, in the Event Viewer, go to Windows Logs, Application and find the most recent warning with Reports ForNAV as the source. For example:


Send the above information to support@fornav.com

Another way to find this information (if you run the RTC client) is to run a report in Preview, then click the Information icon.

In the About ForNAV Runtime dialog box, click License Information. This gives you information about what the program found when searching for a valid license.


Note that this information was added in version 3.0.0.1342. If your version of ForNAV is older than that, you have a couple of other methods outlined below.

Firstly, check the expiry date and NAV license number. Open your list of installed programs and find the installed license under Reports ForNAV license. If you select the entry in the list, then you can see the NAV license number and the expiry date (if one is set). This information is shown in the Comments field for the installed license.

If this does not give you the reason for the Trial message, then you can modify a ForNAV report to show you the problem. Open any ForNAV report in C/SIDE and switch to Code view. Add a message in the OnInitReport trigger, just below the creation of the ReportForNav instance. For example:

OnInitReport()

ReportForNav:= ReportForNav.Report(CurrReport.OBJECTID,CurrReport.LANGUAGE,SERIALNUMBER,USERID,COMPANYNAME);ReportForNav.Init;

MESSAGE(ReportForNav.TrialMessage);

The next time you run the report, it will try to show you where the problem with the license is.

Read more about the ForNAV license.

The post License Validation appeared first on ForNAV.

1ClickFactory and ForNAV

$
0
0

This article is relevant for ForNAV 6.0.0.2064 and newer versions.

The target audience for this article is ForNAV customers who are connecting to a Business Central service tier running on a server hosted by 1ClickFactory.

ForNAV and 1ClickFactory are working together to make it as easy as possible to use the ForNAV Designer and reports in an environment hosted by 1ClickFactory. However, there are some small changes to the service tier configuration that are needed in order to connect the Designer.

It is possible to connect a Designer running on your local workstation. This means that you do not have to install the ForNAV Designer on the server. Sometimes, however, you might want to do that anyway so that you have a central place for your consultants to go to design and work with ForNAV reports for a specific end-user installation.

To install the ForNAV Designer on the server, you must make the following changes:

  • Enable API Services under OData.
  • Change the development port to the default 1104 or another value that can be seen through the firewall.
  • Enable Developer Service Endpoint.
  • Enable SSL for the Developer Service Endpoint.

Apart from these things, you should follow the instructions on our website under Set up the ForNAV Converter and the ForNAV Designer. You should look at the section for an on-premise installation.

https://www.fornav.com/knowledge-base/set-up-the-fornav-converter-and-the-fornav-designer/

The post 1ClickFactory and ForNAV appeared first on ForNAV.

Adding different watermarks to each page

$
0
0

Sometimes you might want to have different watermarks in the report output. To do this, you can use one of the following two options:

  1. Use the ReportForNav.LoadWatermark (AL) or the ReportForNav.AddWatermark (JavaScript)  functions in OnPreReport to set up the watermark per page:
    • In AL: ReportForNav.LoadWatermark(<pageno>,<outstream>)
    • In JavaScript: ReportForNav.AddWatermark(<pageno>,<blobfield>)
    • Where pageno is interpreted as 0 = all, or 1… = page number
  2.  

  3. Use the ReportForNav.Watermark.Image.Load(fromStream) (AL) or ReportForNav.Watermark.Image.Image = Rec.Blob (JavaScript) to set the watermark before page breaks in the OnAftergetRecord or Section trigger.

It is important that you call the function before the report runtime starts printing a new page (because the watermark is printed before that). If you call the function on a section trigger on a header document, the watermark is only printed on the next page. Instead, you must call the function from the OnPreDataItem or a footer trigger on the previous page.

For example: one watermark on the first page and another one on the other pages:

List – OnAfterGetRecord()

IF (ReportForNav.PageNo = 1) THEN

    WatermarkFile.OPEN('C:\Nav Files\A.pdf')

ELSE

    WatermarkFile.OPEN('C:\Nav Files\B.pdf');

WatermarkFile.CREATEINSTREAM(WatermarkStream);

ReportForNav.Watermark.Image.Load(WatermarkStream);

WatermarkFile.CLOSE;

You can also use the function to append different PDF documents to a data item. The ForNAV AppendPdf function adds the same PDF to all data items but if you print a blank page and use the ReportForNav.Watermark.Image.Load(fromStream) function for that page and load a blank watermark after it is printed, you can append a different PDF document for each record.

The post Adding different watermarks to each page appeared first on ForNAV.

Viewing all 372 articles
Browse latest View live